 Skip to content

How To Replace a Sunroof Motor | Easy DIY Guide
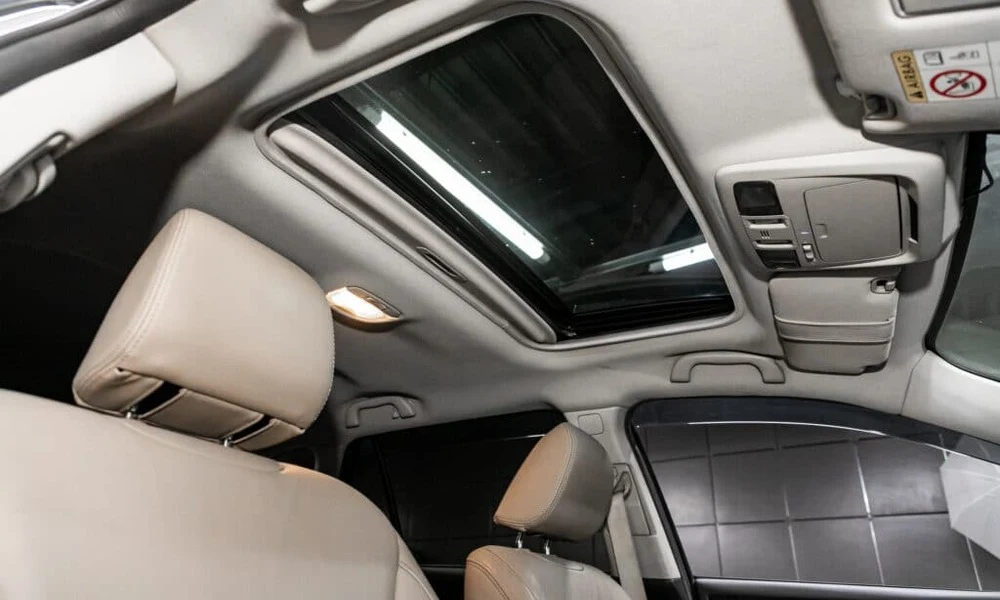
When your sunroof unexpectedly will not open or close, it’s very frustrating especially if it gets stuck on a rainy day. The good news is that how to replace a sunroof motor is easier than most car owners think. With some basic tools and a little patience, you can take matters into your own hands and save yourself some costly shop visits. This tutorial covers all the basics you need to know to understand the motor, identify the problem, remove the bad unit, and safely install a new one. What a Sunroof Motor Actually Does Why is your sunroof so slow to open or close? The motor engages that rotates a gear in the sunroof mechanism to then pull or push the sunroof open. When you press the button, the motor moves the glass back or forward. Gears may become stripped, internal brushes can wear down, or the electrical circuitry can fail, resulting in a sunroof that moves very slowly, jerks, or doesn’t move at all. When that point is reached, and repairs are no longer cost-effective, a complete sunroof motor replacement is advised. Most factory units are a low-profile type, so they will fit without poking out of the headliner or interfering with your overhead lights. It’s neatly hidden away, but also surprisingly attainable if you remove the console and the trim pieces. Where Is the Sunroof Motor Located? If this is your question, where the sunroof motor is located, the answer is the same for pretty much all makes and models: under the front end of the headliner, just behind the overhead light module. In certain vehicles, it can also be installed a little behind the sunroof switch. The motor connects to the rails and cables and is typically held in place with 3-4 Torx bolts. You might have to drop the headliner to get at it, but you won’t likely have to take out the entire roof liner. Tools You Need Before You Begin The upgrade from a standard sunroof motor to this ultra-power sunshine sunroof motor does not need special tools, but having the right tools makes the replacement easier and lessens the risk to your car’s interior if plastic trim needs to be removed. Here are all the things you need wonder under the bonnet: Trim Removal Tools – Make your life easier and don’t scratch your plastic covers when you remove them. Screwdriver Set – Phillips and flat-head screw drivers might be required. Torx Bit Set (T25/T30) – The majority of sunroof motors are secured by Torx bolts. Socket Wrench – For longer bolts, or if you’re going through a structural bracket. Multimeter – If you’d like to check that power is getting to the motor. Flashlight – To light up the confined spaces of the roof. Splitting the tasks will let you keep going when you have to stop, if you have to stop. How To Replace A Sunroof Motor (Step-by-Step Guide) If your sunroof is jammed closed or won’t move at all, this guide provides step-by-step instructions on how to replace sunroof motor components safely and properly. 1. Disconnect the Vehicle Battery The first and most important step is to disconnect the negative battery terminal. It keeps the sunroof from randomly sliding around, it protects your electrical system, and it helps keep your hands safe when you’re leaning over the motor and its gears. 2. Remove the Overhead Console Use your panel tool to pry the overhead console down gently. This area is usually where your lights, microphone, and sunroof button are located. Unplug the wire connectors with care to avoid breaking the clips. When you take this console out, you’ll be able to get your first open look at the headliner area. 3. Partially Lower the Front Headliner You never have to take out the whole headliner. Instead, just bring down the part closest to the windshield. You might have to take out: Sun visors A-pillar trim Plastic edge moldings It is this step that will give you enough space to access the motor assembly. Go slow headliners will crease if you flex them too far. 4. Locate and Remove the Motor With a slight drop of the headliner, you’ll find the small motor housing located close to the sunroof tracks. Unscrew the 3-4 Torx screws that hold it. Store the screws in a secure place since you will require them to install the new motor. Then, disconnect the motor’s wiring harness. Compare the old motor with the new one once you have taken it out to make sure they have the same dimensions, connectors, and type of gear. 5. Install the New Sunroof Motor Plug in the electrical connector to the new motor gently. Seat the motor gear into the sunroof track mechanism. This is a critical moment off-kilter alignment means clicks, jams, or partial travel. When aligned correctly, reinstall the bolts and tighten them down while using a criss-cross pattern so the motor will be flush. 6. Test the Sunroof Motor Temporarily reconnect your battery and test the sunroof switch. Everything should be moving smoothly and evenly. If the sunroof is working, disconnect the battery again and continue with reassembly. If the sunroof does not respond, recheck: Gear alignment Power connector Tightness of mounting bolts This prevents you from putting the interior back together just to find out something is off. 7. Reinstall the Trim and Headliner When the motor is working, reinstall: The section of the headliner A-pillar trim Sun visors Overhead console Once you have everything back in its place, you can fully reconnect the battery. Your sunroof should now work like new. You can read about: What Is The Difference Between A Sunroof And A Moonroof How to Fix Sunroof Motor Issues Without Replacing It Here are a few things to do before you decide to replace it. You can sometimes fix sunroof motor problems without buying a new part. Check the Fuse A dead sunroof can be caused by a blown fuse. Find your sunroof fuse in the owner’s manual and check it. If the metal strip inside the fuse is broken, replace
How To Replace a Sunroof Motor | Easy DIY Guide Read More »
