How to Repair Small Chip in Windshield | Full Guide
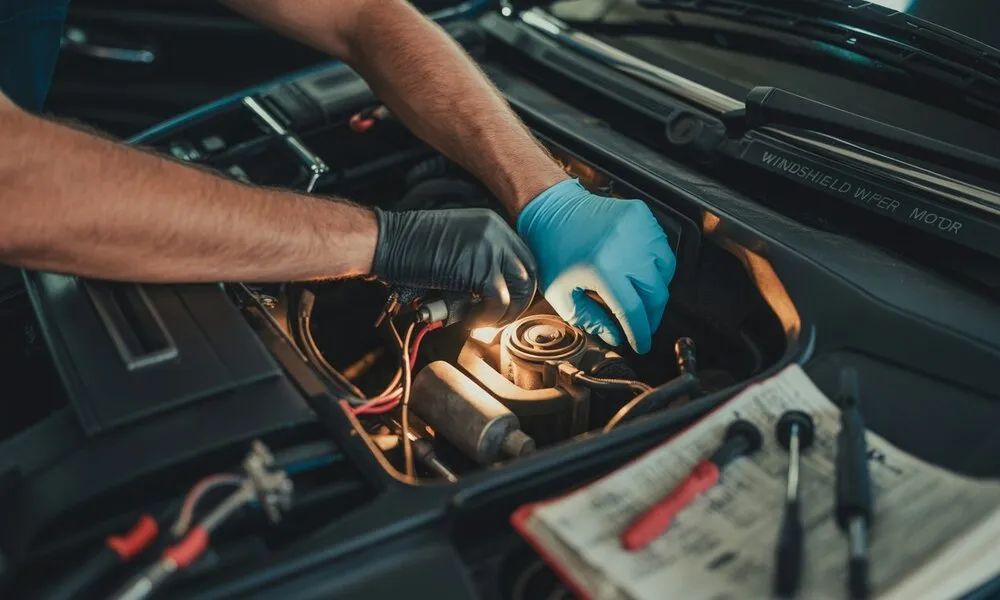
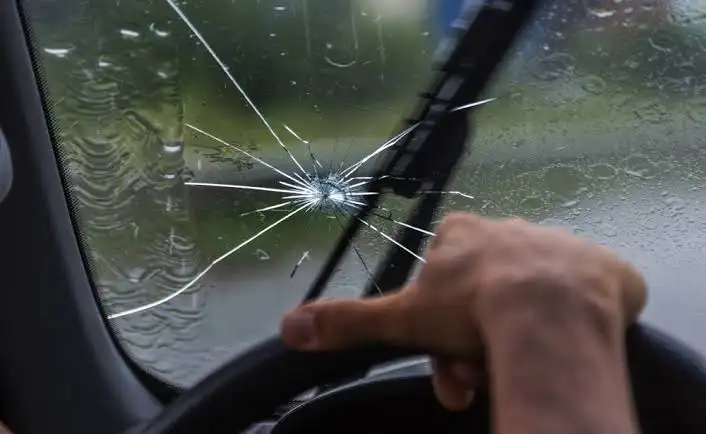
You’re driving and suddenly a rock flies up and hits your windshield. You pull over and find a small chip. It’s not a crack yet. But you know if you leave it, it will spread. The good news is that most small chips are fixable without replacing the entire windshield. Acting fast is the key. Knowing how to repair small chip in windshield glass the right way can save you hundreds of dollars. Most tiny chips in windshield glass can be fixed in under an hour with the right kit or by a professional for a reasonable fee. Here’s everything you need to know to handle it correctly. Can You Repair a Small Chip in a Windshield? Yes, most small chips are highly repairable. The success of the repair depends on the size, depth, and location of the glass damage. If the damage is smaller than a credit card or a quarter, a fix is usually highly successful. The glass used in cars has three layers. There are two layers of glass with a clear plastic layer sandwiched right between them. When an object hits the glass, it usually only breaks the outer layer. A quick fix works by filling that empty air pocket with a strong, clear liquid acrylic resin. What Causes Small Chips in a Windshield? Windshield chips happen fast and often without warning. The most common causes include: Gravel and road debris kicked up by vehicles in front of you Truck tires throwing stones at highway speeds Construction zones with loose aggregate on the road Temperature stress causing existing micro-cracks to fracture suddenly Hail during storms, which creates multiple impact points across the glass Parking under trees where small branches or acorns fall Most chips happen on the highway. The combination of vehicle speed and flying debris creates enough force to puncture the outer layer of laminated windshield glass. Types of Windshield Chips You Can Repair Not every chip looks the same. Understanding the type helps you assess whether a DIY fix is realistic or whether you need a professional. Bullseye Chip A circular impact point with a cone-shaped void underneath. Clean edges, easy to fill. One of the most repair-friendly chip types. Half-Moon Chip Similar to a bullseye but not fully circular. Usually caused by an angular impact. Repairable in most cases. Star Break Multiple cracks radiating from a central impact point. Looks like a star. Repairable if the legs are short usually under an inch each. Combination Break A mix of bullseye and star break characteristics. More complex to fill but still repairable by a professional in many cases. Pit or Ding A small surface chip with no visible cracks extending outward. These tiny chips in windshield glass are the easiest to repair and the best candidates for DIY kits. Edge Crack Starts within two inches of the windshield border. These are tricky and often not repairable — the edge stress makes crack propagation unpredictable. What You’ll Need for DIY Repair If you decide to fix a small chip in windshield glass yourself, you’ll need the right supplies. A basic windshield chip repair kit from an auto parts store contains most of what you need: Windshield repair resin (clear, UV-curing) Applicator bridge or syringe tool UV curing strips or access to sunlight Razor blade for leveling excess resin Rubbing alcohol and clean cloths A pin or thumbtack for clearing debris from the chip Quality matters here. Budget kits under $10 often produce poor results. Spend $20 to $35 on a reputable kit from brands like Rain-X, Permatex, or 3M. The resin viscosity and the applicator design make a real difference in the final result. How to Repair a Small Chip in a Windshield: Step-by-Step This process works best on chips smaller than a quarter, in mild weather, out of direct sunlight. Do not attempt this in rain or freezing temperatures. Step 1: Clean the Chip Thoroughly Use rubbing alcohol and a clean cloth to wipe the area around the chip. Let it dry completely. Use a pin or thumbtack to remove any loose glass fragments or debris from inside the chip. Any contamination trapped under the resin will affect the bond. Step 2: Set Up the Applicator Most kits use an adhesive mounting bridge that centers over the chip. Attach it to the windshield according to the kit instructions. Make sure it’s centered directly over the impact point. Step 3: Apply the Resin Load the resin into the syringe or applicator. Inject it slowly into the chip. Apply gentle pressure to push the resin into the void. Then pull back the plunger to create a vacuum that draws air bubbles out. Repeat this pressure-and-vacuum cycle 3 to 5 times. Step 4: Cure the Resin Place the UV curing strip over the filled area or position the car in direct sunlight. Most resins cure in 5 to 10 minutes under UV exposure. Do not rush this step incomplete curing leaves the repair soft and ineffective. Step 5: Remove Excess Resin Once cured, remove the applicator and strip. Use the razor blade at a flat angle to scrape away any resin that sits above the glass surface. Work gently, you’re leveling, not scraping aggressively. Step 6: Final Polish Buff the area lightly with a clean cloth. The surface should feel smooth and flush with the surrounding glass. The chip will still be visible as a faint mark, but the structural repair is complete. This is the core process for how to repair small chip in windshield glass at home. Follow each step carefully and don’t rush the curing stage. You can read about: How Much Does a Rock Chip Repair Cost Common Mistakes to Avoid During Windshield Chip Repair Many people fail when fixing small chips in windshield glass because they rush the process. Critical Warning: Never do this work under direct sunlight. The sun will harden the liquid before it fills the tiny cracks, ruining the job. Another mistake is leaving moisture inside the pit.
How to Repair Small Chip in Windshield | Full Guide Read More »