
A damaged rear quarter window can leave your vehicle exposed to rain, dust, noise, and potential theft. Although quarter glass is smaller than a windshield or main side window, replacing it still requires careful handling because the glass, trim, weather seals, clips, and adhesive all need to work together correctly.
If you are researching how to replace rear quarter window, it is important to understand that the exact process varies by vehicle. Some quarter windows are held in place with clips, fasteners, or weatherstripping, while others are permanently bonded to the vehicle body. Quarter glass can also be stationary or movable depending on the vehicle design.
Because of these differences, the safest approach is to use the vehicle-specific repair information for your make and model and avoid forcing trim or glass that does not release as expected.
What Is a Rear Quarter Window?
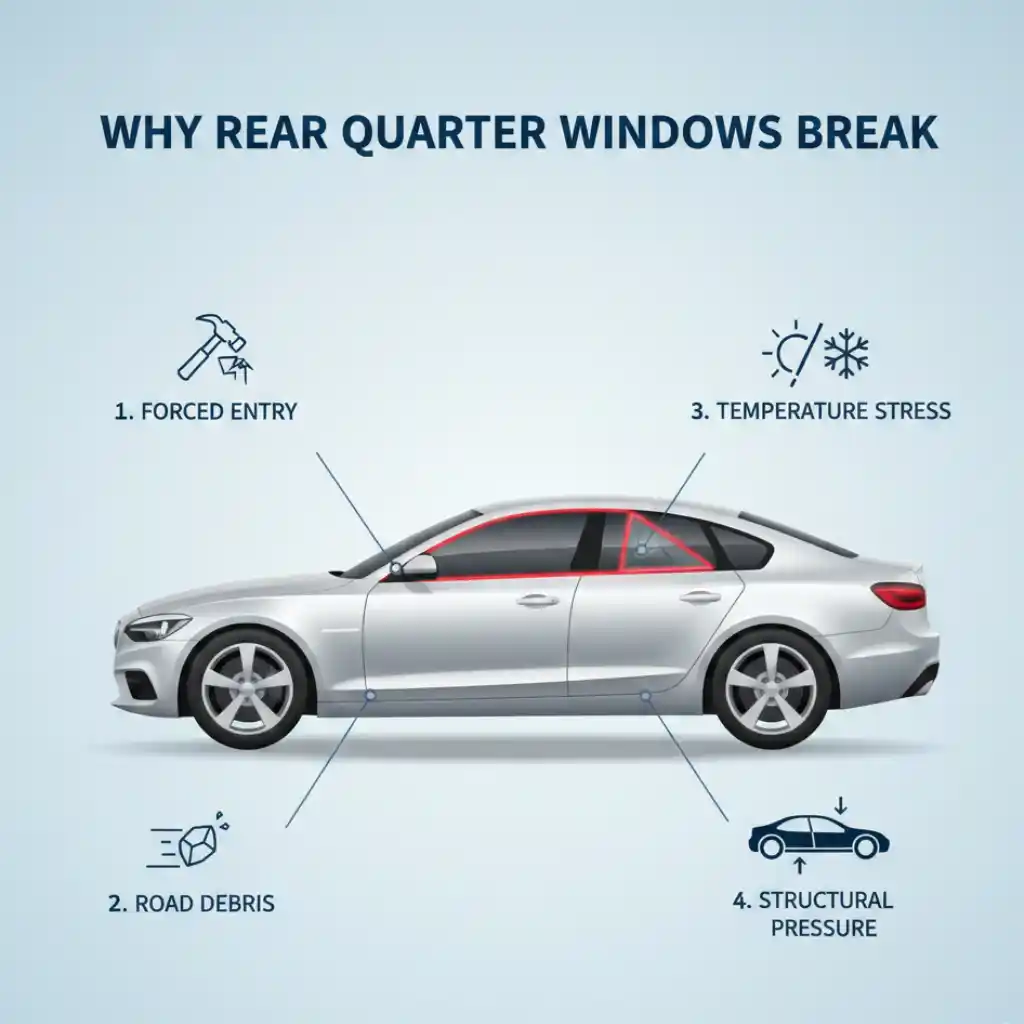
The rear quarter window is the smaller piece of glass located behind the main side window and generally ahead of the rear wheel area. It is sometimes called quarter glass or a quarter glass window.
Unlike the main door glass, a quarter window may not move at all. Some vehicles use a fixed piece of glass, while others have a vent-style quarter window that can open or tilt.
The design is important because the replacement method depends on how the glass is attached. A mechanically retained quarter glass window car may require removal of trim and retaining hardware, while bonded glass requires careful adhesive removal and surface preparation.
When Does a Quarter Glass Window Need Replacement?
A quarter glass window may need replacement when it is shattered, cracked beyond repair, or damaged in a way that affects its safe use.
Broken quarter glass should not simply be covered permanently with plastic or another temporary material. Temporary protection may help keep weather out while you arrange service, but it does not restore the vehicle’s original glass.
Because quarter glass is part of the vehicle’s safety glazing system, significant damage should be assessed rather than ignored. Automotive glass specialists also recommend replacing damaged quarter glass rather than continuing to use a severely damaged pane.
Can You Replace a Rear Quarter Window Yourself?
In some vehicles, an experienced DIYer may be able to handle a quarter glass replacement, particularly when the glass is mechanically retained and the vehicle-specific procedure is straightforward.
However, bonded glass is more demanding. Removing the old adhesive without damaging the surrounding bodywork, preparing the bonding surfaces correctly, selecting compatible automotive glass adhesive, and positioning the new glass accurately all require care.
Automotive urethane products are specifically designed for bonding stationary vehicle glass, and manufacturer guidance includes dedicated procedures for surface preparation, primer, and urethane application.
For this reason, professional installation is often the safer choice when the quarter glass is bonded or when you do not have the correct tools and vehicle-specific instructions.
Tools and Materials You May Need
The exact equipment depends on the vehicle and how its quarter glass is installed. A replacement job may require trim-removal tools, protective gloves, cleaning supplies, appropriate glass-handling equipment, and replacement clips or fasteners.
For bonded glass, the installation may also require automotive-grade urethane and the appropriate primer or surface-preparation products specified by the adhesive manufacturer.
Do not substitute ordinary household silicone or construction adhesive for a product intended for automotive glass. Automotive glass adhesives are engineered for vehicle glass bonding and sealing.
The replacement glass itself should also be the correct piece for the vehicle. Shape, dimensions, tint, mounting points, and other features need to match the original application.
How To Replace Rear Quarter Window
1. Confirm the Correct Replacement Glass
Start by identifying the exact vehicle information, including the year, make, model, body style, and the side of the vehicle that needs the replacement.
Do not assume that two vehicles with similar body designs use the same quarter glass. Even small differences in shape, mounting points, tint, or molding can prevent the replacement from fitting correctly.
Before removing the damaged glass, compare the replacement piece with the original whenever possible. Check its shape and mounting features so you can identify an incorrect part before the vehicle is left without usable glass.
2. Prepare the Vehicle and Work Area
Park the vehicle on a stable, level surface and give yourself enough space to work around the affected side.
Protect the interior from broken glass and debris. Wear appropriate hand and eye protection when handling shattered glass.
If the window is broken, remove loose pieces carefully rather than grabbing large fragments with bare hands. Small glass particles can remain around the window opening, trim, and interior surfaces.
A clean work area also makes it easier to identify clips, fasteners, and trim pieces during disassembly.
3. Remove the Interior Trim
Quarter glass is often surrounded by interior trim or molding that must be removed before the glass can come out.
Use an appropriate trim-removal tool rather than prying aggressively with a screwdriver. Plastic clips can break if too much force is applied, and damaged trim can create additional repair costs.
Keep the removed clips and fasteners organized. If the vehicle uses different fasteners in different locations, note where each one belongs.
The exact trim-removal sequence should come from the vehicle-specific repair information because manufacturers use different panel designs.
4. Determine How the Glass Is Secured
Before attempting to pull the glass out, determine whether it is retained by hardware, weatherstripping, adhesive, or a combination of these methods.
Some quarter glass can be released after removing retaining nuts or clips. Other designs require the weatherstrip to be carefully released. Bonded quarter glass requires a different removal process because the adhesive must be separated from the glass and vehicle body.
For example, professional quarter-glass procedures can involve removing quarter-panel trim, removing retaining hardware, cleaning the mounting area, installing new adhesive, positioning the replacement glass, and reinstalling the trim.
Do not force the glass simply because it does not move. If it is still attached, stop and determine what is holding it in place.
5. Remove the Damaged Glass Carefully
Once the retaining system has been identified and the surrounding trim has been removed, the damaged glass can be removed using the appropriate vehicle-specific method.
For bonded glass, specialized glass-removal tools may be required to separate the adhesive while reducing the chance of damaging the body or surrounding components.
Broken glass should be controlled during removal so that pieces do not fall into the interior, door cavity, or other hard-to-reach areas.
If you encounter heavy resistance, stop rather than applying excessive force. A hidden fastener, molding, or adhesive section may still be securing the glass.
6. Clean and Inspect the Window Opening
After the old glass is removed, inspect the opening carefully.
Remove loose glass fragments and debris and clean the mounting area according to the adhesive or vehicle manufacturer’s requirements.
This step is especially important for bonded quarter glass. The new adhesive needs a properly prepared bonding surface. Automotive glass installation procedures specifically address cleaning, surface preparation, primer, and adhesive application.
Also inspect the surrounding bodywork for scratches, corrosion, damaged clips, or other problems that could affect the replacement.
If the vehicle’s body or mounting area has been damaged, address that problem before installing the new glass.
7. Prepare the Bonding Surface When Required
If the replacement quarter glass window is bonded, the bonding surfaces must be prepared using the procedure specified for the particular adhesive and vehicle.
This can include cleaning the glass and body surface and using a compatible primer where required.
Primer is not simply an optional cosmetic product. Automotive glass primers can be designed to promote urethane adhesion and help protect suitable metal surfaces from corrosion when used according to the manufacturer’s instructions.
Do not guess about primer compatibility or application. Follow the adhesive manufacturer’s technical instructions and the vehicle repair procedure.
8. Apply the Correct Automotive Glass Adhesive
Bonded quarter glass should use an adhesive specifically intended for automotive glass applications.
Automotive urethane products are designed to create strong bonds for stationary vehicle glass and can also provide sealing against water intrusion when properly installed.
The adhesive needs to be applied in the correct amount and pattern for the particular glass and vehicle. Too little adhesive can create bonding or sealing problems, while incorrect application can affect glass positioning.
Because adhesive handling involves product-specific safety requirements and curing times, follow the manufacturer’s technical documentation rather than relying on a generic procedure.
9. Position the Replacement Glass
Once the bonding system is prepared, the replacement glass needs to be positioned carefully.
Avoid repeatedly lifting and repositioning the glass after it contacts the adhesive. The goal is to place the glass correctly and evenly within the opening while maintaining the intended alignment with the surrounding body and trim.
A professional installation may use guides, setting blocks, or other positioning methods depending on the vehicle.
Check the alignment before the adhesive begins setting. The glass should sit evenly and should not place unnecessary pressure on surrounding trim or body panels.
10. Reinstall the Trim and Retaining Hardware
After the glass is positioned, reinstall the appropriate retaining hardware, weatherstripping, clips, and interior trim.
Do not force trim pieces into place. If a panel does not fit correctly, check whether a clip is missing, misplaced, or interfering with the glass.
Damaged clips should be replaced rather than ignored. Properly fitted trim helps maintain the finished appearance and can also help protect the edges of the glass and surrounding components.
11. Allow the Adhesive to Cure
One of the most important steps is allowing the adhesive to cure according to its manufacturer’s instructions.
Do not assume that an adhesive is ready simply because its surface feels firm. Different products have different working and curing characteristics.
For example, automotive urethane products are available with specific working and curing times, and the manufacturer determines the conditions under which the adhesive achieves its intended bond.
Follow the product’s technical data and the vehicle manufacturer’s requirements before driving the vehicle.
You can also read about: How To Fix Window Off Track In Easy Steps.
How Do You Check the New Quarter Glass?
After installation, inspect the glass from both inside and outside the vehicle.
Check that the glass is evenly positioned and that the surrounding trim sits correctly. Look for visible gaps, damaged molding, loose clips, or areas where the glass appears misaligned.
If the glass is bonded, a water-leak check may also be appropriate after the adhesive has properly cured. Water entering around the new glass can indicate a sealing or installation problem.
Also make sure the interior is free of broken-glass particles and that removed trim has been correctly reinstalled.
Common Mistakes to Avoid
One common mistake is ordering the wrong replacement glass. Always verify the exact vehicle application before purchasing a replacement.
Another mistake is using excessive force during trim or glass removal. This can damage clips, weatherstripping, paint, or the vehicle body.
Using the wrong adhesive is another serious problem. Household sealants are not interchangeable with automotive glass bonding products.
Poor surface preparation can also affect the quality of a bonded installation. The bonding area needs to be prepared according to the adhesive and vehicle requirements.
Finally, do not rush the curing process. The adhesive manufacturer’s specified curing conditions should be followed before the vehicle is returned to normal use.
When Should You Hire a Professional?
A professional replacement is worth considering when the quarter glass is bonded, heavily shattered, difficult to access, or surrounded by complicated trim.
Professional auto-glass technicians have the tools and procedures needed to remove damaged glass while reducing the risk of damage to the vehicle.
This can be particularly important when the installation depends on automotive urethane. Manufacturer documentation for stationary auto glass includes specific procedures for removing existing glass, preparing surfaces, applying primer, and installing urethane.
If you are unsure how your vehicle’s rear quarter panel window is attached, getting the glass inspected before attempting removal can prevent an avoidable mistake.
For drivers in Austin who need professional service, Car Window Replacement in Austin can be a better option when the glass or installation process is beyond a practical DIY repair.
Texas Reliable Auto Glass can help vehicle owners address damaged auto glass and determine the appropriate replacement solution for their vehicle.

Conclusion
Learning how to replace rear quarter window starts with understanding that there is no universal procedure for every vehicle. Some quarter glass is held with clips, fasteners, or weatherstripping, while other designs use automotive adhesive.
The replacement process generally involves identifying the correct glass, protecting the vehicle, removing the necessary trim, carefully removing the damaged glass, preparing the mounting area, installing the appropriate adhesive when required, positioning the replacement glass, reinstalling the trim, and allowing the installation to cure properly.
The most important part is not simply getting the new glass into the opening. The glass needs to fit correctly, remain properly sealed, and be installed using the method and materials appropriate for that vehicle.
If the procedure involves bonded glass or you are unsure about the mounting system, professional quarter glass replacement can help reduce the risk of broken trim, water leaks, poor adhesion, or additional vehicle damage.
Frequently Asked Questions
What is a quarter glass window?
A quarter glass window is a smaller side window located behind the main side window and generally near the rear section of the vehicle. Depending on the vehicle, it may be fixed or designed to open or tilt.
Is quarter glass the same as the rear side window?
Not always. Quarter glass is generally the smaller glass section behind the main side window. The exact location and design depend on the vehicle.
Can I replace a quarter glass window myself?
Some mechanically retained quarter windows may be manageable for an experienced DIYer, but bonded glass requires more specialized tools, materials, and preparation. If you are unsure how the glass is attached, professional replacement is the safer approach.
How is bonded quarter glass held in place?
Bonded quarter glass is attached to the vehicle body using automotive glass adhesive, commonly a urethane-based system. The bonding surfaces must be properly prepared according to the adhesive and vehicle requirements.
Can I use silicone to install quarter glass?
You should not substitute ordinary household silicone for an automotive glass adhesive system. Use a product specifically approved for the intended automotive glass application and follow its installation instructions.
How do I know which quarter glass to buy?
Use the vehicle’s year, make, model, body style, side, and other applicable identifying information to confirm the correct glass. Compare the replacement piece with the original before installation whenever possible.
What should I do if the quarter glass breaks?
Keep people away from loose glass and protect the vehicle from weather while arranging proper replacement. Avoid driving with severely damaged glass if doing so creates a safety or visibility concern.
How long does quarter glass replacement take?
The time varies by vehicle design and the type of glass retention system. A simple mechanically retained quarter glass can require a different amount of work than a bonded installation. The exact time should be confirmed for the specific vehicle.
Can a cracked quarter glass be repaired instead of replaced?
Whether repair is possible depends on the type, location, and extent of the damage and the specific glass. Severely damaged or shattered quarter glass generally requires replacement rather than a simple repair.
Should I replace damaged trim during quarter glass replacement?
If clips, weatherstripping, molding, or trim are damaged during the original incident or removal process, replacing the affected components may be necessary for proper fit and appearance.