


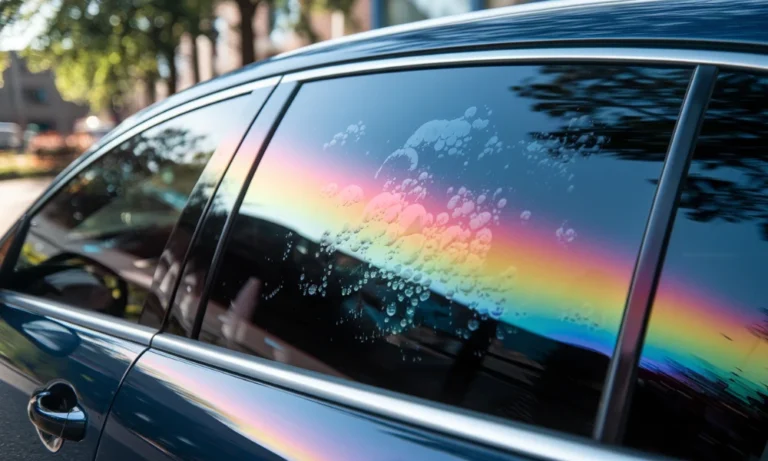
So you want to know how to repair window tint bubbles and what to do about window tint bubbles after install. These bubbles are really bad because they make your windows look ugly. They can also make the tint start to peel and not work as well. If you fix the bubbles away your window tint will last longer and you will be able to see better when you are driving.
To fix the bubbles you can use a different things like heat or a special tool called a squeegee or even a sharp pin to get the air out from under the tint and make it smooth again. Window tint bubbles are a problem for car owners and fixing window tint bubbles is pretty important. Knowing how to fix bubbles in tint properly can prevent further damage and restore a flawless finish to your windows.
What Causes Tint Bubbles After Install?
If you have noticed tint bubbles after installation it can be really frustrating. It totally ruins the nice look of your car windows. These bubbles usually form because of a things, including:
1. Poor Installation Techniques
If you do not handle the film correctly or if you do not use enough slip solution or if you do not smooth out the tint film properly you will get air pockets. When a professional installs the tint film the finish is really nice and smooth. There is a very small chance that the tint film will bubble. The professional installation of the film is the best way to get a good finish with the tint film and to avoid problems, with the tint film.
2. Low-Quality Tint Film
When you buy films they usually have weaker glue. This means they can start to bubble, peel or change color after a while. If you spend a little money on good quality window tint you can avoid these problems with the window films. Investing in high-quality window films is an idea.
3. Trapped Air or Moisture During Installation
When you put the film on the glass sometimes air or moisture gets stuck between them. This can cause bubbles to form. The film will dry out over time. Some of the small bubbles will go away.. The big bubbles will stay there. If that happens you will have to put the film on.
4. Heat Exposure and Adhesive Failure
When you leave your window tint in the sun for a time it can get weak from the sunlight and heat. This can make the tint film come loose and get bubbles in it. If you park your car in the shade or use something to block the suns rays it can help your window tint last longer. You can make your window tint longer by parking, in shaded areas or using UV protection.
How to Prevent Tint Bubbles After Install
- Choose a professional installer with experience.
- Use high-quality tint film with strong adhesive properties.
- Allow proper curing time before rolling down windows.
- Keep windows clean and dry before installation.
If you’ve already noticed tint bubbles after install, some may disappear within a few days. However, persistent bubbles might require professional repair or a complete redo.
I really hate it when I finish putting tint on a window. Then I see those little bumps. They are so annoying. If you have bubbles in your window tint after you put it on you do not have to take it all off and do it again. Most of the time you can fix the bubbles yourself if you are careful and have a hand, with the window tint bubbles. Fixing window tint bubbles can be a help.
How To Repair Window Tint Bubbles Five Easy Steps
Step 1: Get Your Stuff Ready
You do not need anything. Just get a hairdryer. If you are really careful you can use a heat gun, a credit card or a squeegee a thin sewing pin and a spray bottle with a little bit of dish soap and water, in it.
Step 2: Warm Up the Window Tint Film
To get the bubbles out of the window tint after you put it on you need to warm it up a bit. Take a hairdryer. Set it to low. Then gently hit the bubbles with the air. The window tint film should feel warm to the touch. Not hot.
This makes the sticky stuff, underneath the window tint film soft again. It becomes sticky and flexible. That is what you need to make the window tint film lay flat on the window.
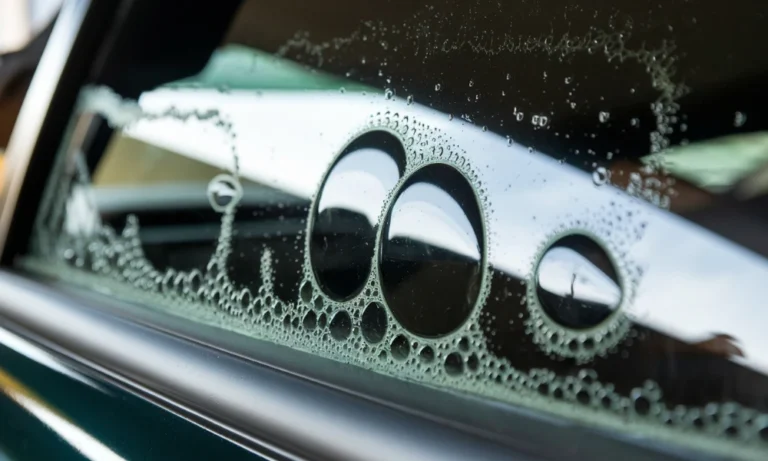
Step 3: Get Rid Of The Air Pocket
This part can be a bit scary. It really works. Take your pin. Make a tiny hole right in the middle of the air pocket. You do not want to cut the tint you just want to make a hole so the air pocket or moisture can get out of the air pocket. The air pocket needs to be able to escape. This tiny hole will do that for the air pocket.
Step 4: Smooth and Squeegee
First you need to mist the outside of the tint with your soapy water. This helps your credit card glide over the tint without scratching it.
Now start from the edges of the bubble. Then firmly push toward the hole you poked in the tint. The air, in the bubble will flatten out as it is forced through the pinhole in the tint. You will see the air come out of the tint as you do this.
Step 5: Let the Tint Set
Let it Cure Now for the hardest part: patience. Leave the windows alone and keep them rolled up for at least 48 hours. The glue needs that time to dry and grab onto the glass again so the bubbles don’t just crawl back.
You can also read about how much does a car window repair cost.
Will Bubbles in Tint Go Away on Their Own?

The Wait and See Phase Right after a fresh job, you’ll often see tiny pockets. These are usually just water blisters from the installation liquid. Because the film is porous, that moisture needs time to evaporate. Depending on the weather, these bubbles in window tint after installation usually clear up on their own within a few days to two weeks. Parking in the sun can actually help bake that moisture out faster.
Temporary vs. Permanent
- The Good Kind (Moisture): These look like tiny, hazy pockets of water. Just be patient—they almost always dry out and flatten perfectly.
- The Bad Kind (Air or Dirt): If you see tint bubbles after install that look crisp and clear, or have a tiny speck of dust in the center, they are likely permanent. These won’t go away because air or dirt doesn’t evaporate like water does.
When You Need a Window Tint Bubbling Fix
If you still see bumps after two or three weeks, it’s time to take action. They won’t just look ugly; they can eventually cause the film to peel. You can try a DIY window tint bubbling fix by using a hairdryer to soften the glue and a fine pin to vent the air, then smoothing it out with a squeegee. However, if the bubbles are huge or the film is actually lifting, your best bet is to head back to the pro shop for a redo to get that clean, flawless look back.
You can also read about car windshield replacement in Austin Tx.
How Long Should Tinted Windows Last?
The Quality of the Film You get what you pay for here. The material is the biggest factor in whether your windows stay dark or start failing:
- Ceramic: This is the top-tier stuff. It’s incredibly tough, blocks the most heat, and usually lasts 10+ years.
- Carbon: Really durable and won’t fade out on you easily. Expect about 7–10 years.
- Metallic: Decent lifespan of 5–7 years, but it can sometimes mess with your phone or GPS signal.
- Dyed: These are the cheapest. They look okay at first, but they are the most likely to experience window tint bubbling or fading within 2–5 years.
Sun and Weather Exposure If your car is parked outside in the baking heat all day, the UV rays are going to eat away at the adhesive. High humidity can make the edges lift, and extreme cold can make the film brittle enough to crack.
The Quality of the Install A pro install is worth it. If the glass wasn’t prepped perfectly, you’ll see bubbles in window tint after installation almost immediately. While tiny water spots usually dry out, a bad adhesive bond means the tint won’t last half as long as it should.
How to Make It Last Longer
- Park in the Shade: Whenever you can, find a garage or a tree. It stops the sun from “cooking” the film and keeps the color from fading.
- Hands Off at First: After you get a new tint, do not roll those windows down for at least 3 to 5 days. The film needs that time to actually stick to the glass.
- No Ammonia: This is a big one. Stay away from Windex or anything with ammonia—it will literally dissolve the tint’s protective coating. Use a microfiber cloth and some mild, soapy water.
- Fix Small Problems Fast: If you see a bubble, don’t just leave it. Knowing how to repair window tint bubbles while they’re small can prevent the whole sheet from peeling and save you a lot of money.
When to Consider Professional Window Tint Repair or Replacement
It’s frustrating when you try every trick in the book but your window tint still looks like a mess. While a DIY window tint bubbling fix can save a minor spot, there are times when you just have to call in the pros to get it done right.
When DIY Fixes Just Won’t Cut It
Sometimes, no amount of heat or pin-pricking will save the film. You should probably look into professional help if you notice:
- Bubbles That Won’t Quit: If you’ve tried to fix them and they just keep coming back, the adhesive is likely shot or moisture is trapped deep under the film.
- Peeling and Cracking: Once the edges start curling or the film feels brittle, it’s game over. You can’t “glue” that back down effectively.
- The “Purple” Fade: If your windows are turning purple or look hazy, the UV protection has failed. No DIY fix can bring the color or protection back.
- Can’t See Clearly: If the bubbles or fading are making it hard to drive at night or in the rain, it’s a major safety risk that needs a full replacement.
Why Go Professional?
Heading to a shop like Texas Reliable Auto Glass means you aren’t just getting a sticker on your window; you’re getting a finish that actually lasts. Pros use high-grade ceramic or carbon films that won’t fail in a couple of years, and they usually back their work with a warranty—something you definitely don’t get with a DIY kit. Plus, they make sure your tint stays legal so you aren’t a magnet for a ticket.
Conclusion
Fixing window tint bubbles is not that hard if they are small. You can get rid of small window tint bubbles by using heat and pressure on them. This works well for small window tint bubbles that have moisture in them. Sometimes window tint bubbles do not go away and they just get worse. If your window tint bubbles are, like that you will need to get some help to fix the window tint bubbles. The person fixing the window tint bubbles might have to replace the whole damaged window tint film to fix the window tint bubbles properly.
To keep your windows looking good and prevent bubbles you should stay away, from using harsh cleaners and try to limit how much sun they get. When you get a good quality tint and have it put in by a professional it really makes all the difference. If your tint’s beyond saving, Texas Reliable Auto Glass offers expert re-tinting to restore your car’s look and protection. Don’t wait—get it fixed before the problem spreads!
FAQs
Can bubbling window tint be fixed?
Yes, small bubbles caused by moisture can often be fixed with heat and a squeegee. However, if the bubbles are large or the adhesive has failed, you’ll likely need to replace the tint entirely.
How to get rid of bubbles on window film?
Warm the area with a hairdryer, poke a tiny hole in the bubble with a pin, then spray soapy water and smooth it out with a squeegee. Let it dry completely for at least 48 hours.
Why do cops care so much about tint?
Police need to see inside vehicles for their safety during traffic stops. Illegal tint levels can also obstruct the driver’s visibility, creating a road hazard for everyone.
Can window tint be repaired?
Minor issues like small bubbles can be repaired, but major problems like peeling, fading, or large bubbles usually require removing and replacing the film. Professional assessment helps determine if repair is possible.
Can you touch up window tint?
No, you can’t really touch up window tint like paint. If there’s damage, scratches, or fading in one spot, you’ll need to remove and replace the entire piece of film on that window.


")